kube-scheduler
基本介绍
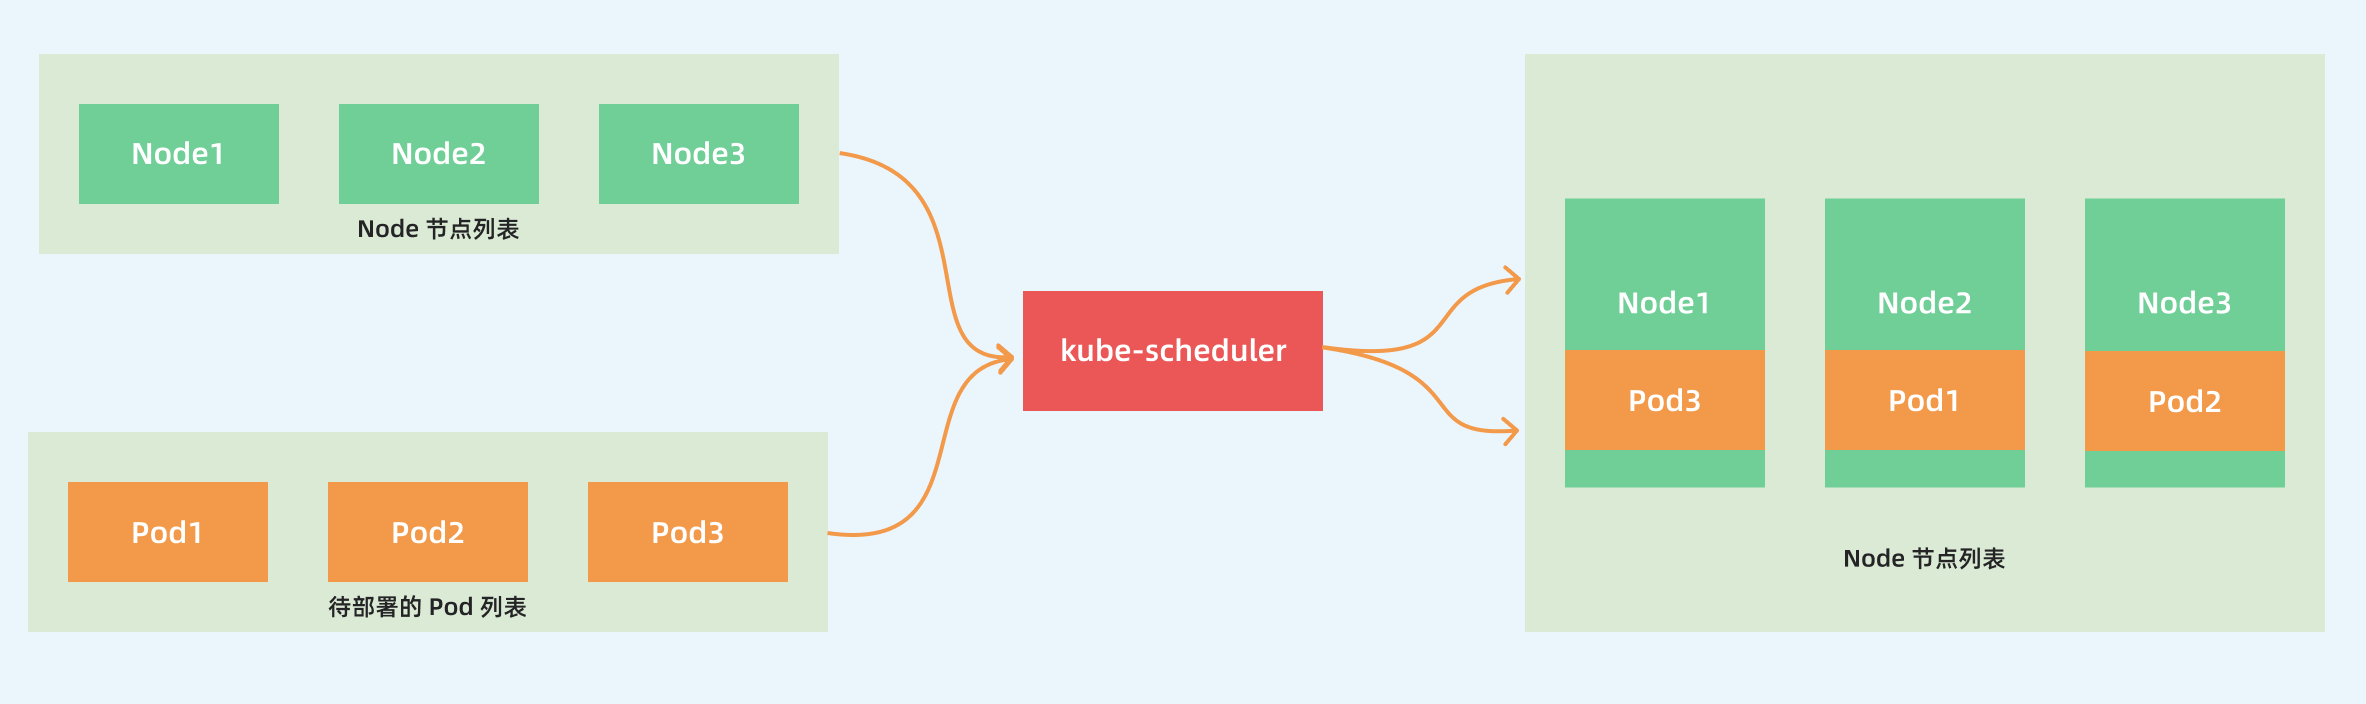
kube-scheduler是kubernetes的核心组件之一,主要负责整个集群资源的调度功能,根据特定的调度算法和策略,将 Pod 调度到最优的工作节点(Node)上面去,从而更加合理、更加充分的利用集群的资源。默认情况下,kube-scheduler提供的默认调度器能够满足我们绝大多数的要求,我们前面和大家接触的示例也基本上用的默认的策略,都可以保证我们的Pod可以被分配到资源充足的节点上运行。但是在实际的线上项目中,可能我们自己会比 kubernetes 更加了解我们自己的应用,比如我们希望一个 Pod 只能运行在特定的几个节点上,或者这几个节点只能用来运行特定类型的应用,这就需要我们的调度器能够可控。
kube-scheduler的主要作用就是根据特定的调度算法和调度策略将 Pod 调度到合适的 Node 节点上去,是一个独立的二进制程序,启动之后会一直监听API Server,获取到 PodSpec.NodeName 为空的 Pod,对每个 Pod 都会创建一个 binding。
kube-scheduler structrue
这个过程在我们看来好像比较简单,但在实际的生产环境中,需要考虑的问题就有很多了:
- 如何保证全部的节点调度的公平性?要知道并不是所有节点资源配置一定都是一样的
- 如何保证每个节点都能被分配资源?
- 集群资源如何能够被高效利用?
- 集群资源如何才能被最大化使用?
- 如何保证 Pod 调度的性能和效率?
- 用户是否可以根据自己的实际需求定制自己的调度策略?
考虑到实际环境中的各种复杂情况,kubernetes的调度器采用插件化的形式实现,可以方便用户进行定制或者二次开发,我们可以自定义一个调度器并以插件形式和 kubernetes 进行集成。
自定义调度器
一般来说,我们有4种扩展Kubernetes调度器的方法。
-
一种方法就是直接clone官方的kube-scheduler源代码,在合适的位置直接修改代码,然后重新编译运行修改后的程序,当然这种方法是最不建议使用的,也不实用,因为需要花费大量额外的精力来和上游的调度程序更改保持一致。 -
第二种方法就是和默认的调度程序一起运行独立的调度程序,默认的调度器和我们自定义的调度器可以通过
Pod的spec.schedulerName来覆盖各自的Pod,默认是使用default默认的调度器,但是多个调度程序共存的情况下也比较麻烦,比如当多个调度器将Pod调度到同一个节点的时候,可能会遇到一些问题,因为很有可能两个调度器都同时将两个Pod调度到同一个节点上去,但是很有可能其中一个Pod运行后其实资源就消耗完了,并且维护一个高质量的自定义调度程序也不是很容易的,因为我们需要全面了解默认的调度程序,整体Kubernetes的架构知识以及各种Kubernetes API对象的各种关系或限制。 -
第三种方法是调度器扩展程序,这个方案目前是一个可行的方案,可以和上游调度程序兼容,所谓的调度器扩展程序其实就是一个可配置的Webhook而已,里面包含过滤器和优先级两个端点,分别对应调度周期中的两个主要阶段(过滤和打分)。 -
第四种方法是通过调度框架(
Scheduling Framework),Kubernetes v1.15版本中引入了可插拔架构的调度框架,使得定制调度器这个任务变得更加的容易。调库框架向现有的调度器中添加了一组插件化的API,该API在保持调度程序“核心”简单且易于维护的同时,使得大部分的调度功能以插件的形式存在,而且在我们现在的v1.16版本中上面的调度器扩展程序也已经被废弃了,所以以后调度框架才是自定义调度器的核心方式。
这里我们可以简单介绍下第四种方式的实现。
Schedule Framework
基本介绍
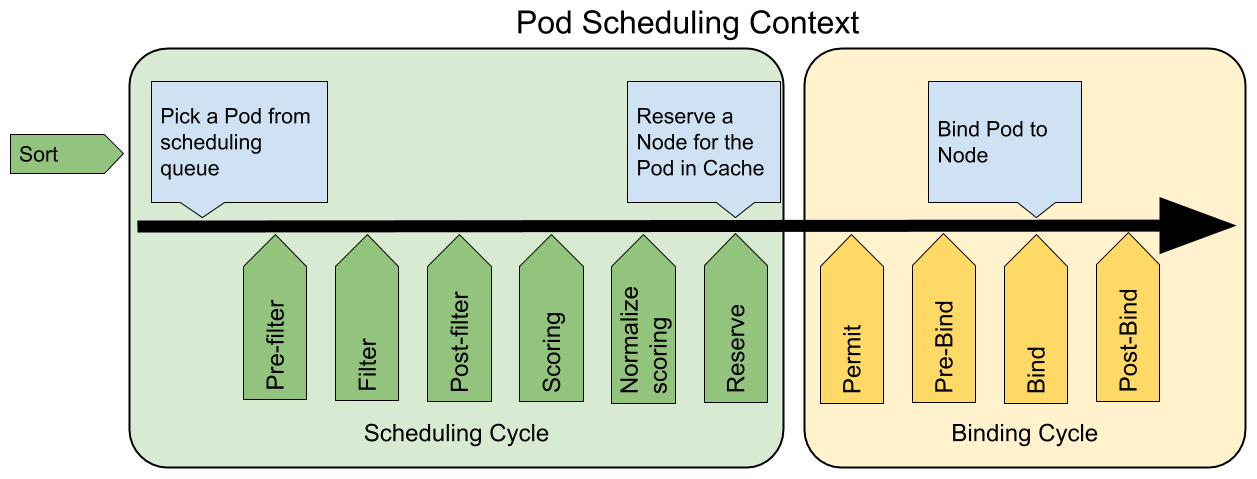
调度框架(Schedule Framework)定义了一组扩展点,用户可以实现扩展点定义的接口来定义自己的调度逻辑(我们称之为扩展),并将扩展注册到扩展点上,调度框架在执行调度工作流时,遇到对应的扩展点时,将调用用户注册的扩展。调度框架在预留扩展点时,都是有特定的目的,有些扩展点上的扩展可以改变调度程序的决策方法,有些扩展点上的扩展只是发送一个通知。
我们知道每当调度一个Pod时,都会按照两个过程来执行:调度过程和绑定过程。
调度过程为 Pod 选择一个合适的节点,绑定过程则将调度过程的决策应用到集群中(也就是在被选定的节点上运行 Pod),将调度过程和绑定过程合在一起,称之为调度上下文(Scheduling Context)。需要注意的是调度过程是同步运行的(同一时间点只为一个 Pod 进行调度),绑定过程可异步运行(同一时间点可并发为多个 Pod 执行绑定)。
调度过程和绑定过程遇到如下情况时会中途退出:
- 调度程序认为当前没有该
Pod的可选节点 - 内部错误
这个时候,该 Pod 将被放回到 待调度队列,并等待下次重试。
扩展点(Extension Points)
下图展示了调度框架中的调度上下文及其中的扩展点,一个扩展可以注册多个扩展点,以便可以执行更复杂的有状态的任务。
scheduling framework extensions
-
QueueSort扩展用于对Pod的待调度队列进行排序,以决定先调度哪个Pod,QueueSort扩展本质上只需要实现一个方法Less(Pod1, Pod2)用于比较两个Pod谁更优先获得调度即可,同一时间点只能有一个QueueSort插件生效。 -
Pre-filter扩展用于对Pod的信息进行预处理,或者检查一些集群或Pod必须满足的前提条件,如果pre-filter返回了 error,则调度过程终止。 -
Filter扩展用于排除那些不能运行该Pod的节点,对于每一个节点,调度器将按顺序执行filter扩展;如果任何一个filter将节点标记为不可选,则余下的filter扩展将不会被执行。调度器可以同时对多个节点执行filter扩展。 -
Post-filter是一个通知类型的扩展点,调用该扩展的参数是filter阶段结束后被筛选为可选节点的节点列表,可以在扩展中使用这些信息更新内部状态,或者产生日志或metrics信息。 -
Scoring扩展用于为所有可选节点进行打分,调度器将针对每一个节点调用Soring扩展,评分结果是一个范围内的整数。在normalize scoring阶段,调度器将会把每个scoring扩展对具体某个节点的评分结果和该扩展的权重合并起来,作为最终评分结果。 -
Normalize scoring扩展在调度器对节点进行最终排序之前修改每个节点的评分结果,注册到该扩展点的扩展在被调用时,将获得同一个插件中的scoring扩展的评分结果作为参数,调度框架每执行一次调度,都将调用所有插件中的一个normalize scoring扩展一次。 -
Reserve是一个通知性质的扩展点,有状态的插件可以使用该扩展点来获得节点上为Pod预留的资源,该事件发生在调度器将Pod绑定到节点之前,目的是避免调度器在等待Pod与节点绑定的过程中调度新的Pod到节点上时,发生实际使用资源超出可用资源的情况。(因为绑定Pod到节点上是异步发生的)。这是调度过程的最后一个步骤,Pod进入reserved状态以后,要么在绑定失败时触发Unreserve扩展,要么在绑定成功时,由Post-bind扩展结束绑定过程。 -
Permit扩展用于阻止或者延迟Pod与节点的绑定。Permit扩展可以做下面三件事中的一项:approve(批准):当所有的permit扩展都 approve 了Pod与节点的绑定,调度器将继续执行绑定过程deny(拒绝):如果任何一个permit扩展 deny 了Pod与节点的绑定,Pod将被放回到待调度队列,此时将触发Unreserve扩展wait(等待):如果一个permit扩展返回了wait,则Pod将保持在permit阶段,直到被其他扩展approve,如果超时事件发生,wait状态变成deny,Pod将被放回到待调度队列,此时将触发Unreserve扩展
-
Pre-bind扩展用于在Pod绑定之前执行某些逻辑。例如,pre-bind扩展可以将一个基于网络的数据卷挂载到节点上,以便Pod可以使用。如果任何一个pre-bind扩展返回错误,Pod将被放回到待调度队列,此时将触发Unreserve扩展。 -
Bind扩展用于将Pod绑定到节点上:
- 只有所有的
pre-bind扩展都成功执行了,bind扩展才会执行 - 调度框架按照
bind扩展注册的顺序逐个调用bind扩展 - 具体某个
bind扩展可以选择处理或者不处理该Pod - 如果某个
bind扩展处理了该Pod与节点的绑定,余下的bind扩展将被忽略
Post-bind是一个通知性质的扩展:
Post-bind扩展在Pod成功绑定到节点上之后被动调用Post-bind扩展是绑定过程的最后一个步骤,可以用来执行资源清理的动作
Unreserve是一个通知性质的扩展,如果为Pod预留了资源,Pod又在被绑定过程中被拒绝绑定,则Unreserve扩展将被调用。Unreserve扩展应该释放已经为Pod预留的节点上的计算资源。在一个插件中,reserve扩展和unreserve扩展应该成对出现。
插件生命周期
1)初始化
初始化有两步:注册和配置。
注册即向默认调度器中注册,配置是通过配置文件的方式决定哪些插件需要初始化。如果插件实现了多个扩展点,也只被初始化一次。
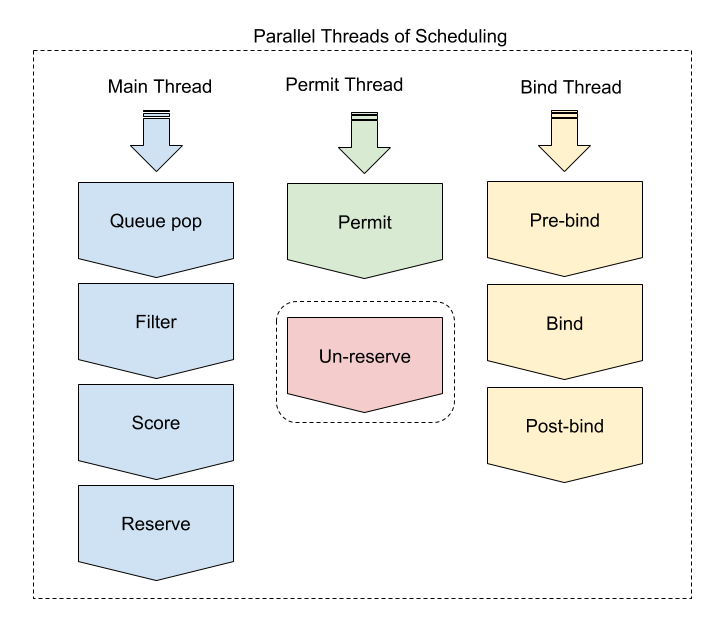
2)并发
插件应该考虑两种类型的并发。在计算多个节点时,可以并发地多次调用插件,并且可以从不同的调度上下文中并发地调用插件。
在调度器的主线程中,一次只处理一个调度周期。在下一个调度周期开始之前,所有包含reserve在内的扩展点都将完成。在reserve阶段之后,绑定周期将异步执行。这意味着可以从两个不同的调度上下文中并发地调用插件,前提是至少有一个调用是在reserve之后调用扩展点。有状态插件应该小心处理这些情况。
最后,根据 Pod 被拒绝的方式,可以从 Permit 线程或 Bind 线程调用 Unreserve 插件。
4、插件注册接口
如果我们要实现自己的插件,必须向调度框架注册插件并完成配置,另外还必须实现扩展点接口,对应的扩展点接口我们可以在源码 pkg/scheduler/framework/v1alpha1/interface.go 文件中找到,如下所示:
// Plugin is the parent type for all the scheduling framework plugins.
type Plugin interface {
    Name() string
}

type QueueSortPlugin interface {
    Plugin
    Less(*PodInfo, *PodInfo) bool
}

// PreFilterPlugin is an interface that must be implemented by "prefilter" plugins.
// These plugins are called at the beginning of the scheduling cycle.
type PreFilterPlugin interface {
    Plugin
    PreFilter(pc *PluginContext, p *v1.Pod) *Status
}

// FilterPlugin is an interface for Filter plugins. These plugins are called at the
// filter extension point for filtering out hosts that cannot run a pod.
// This concept used to be called 'predicate' in the original scheduler.
// These plugins should return "Success", "Unschedulable" or "Error" in Status.code.
// However, the scheduler accepts other valid codes as well.
// Anything other than "Success" will lead to exclusion of the given host from
// running the pod.
type FilterPlugin interface {
    Plugin
    Filter(pc *PluginContext, pod *v1.Pod, nodeName string) *Status
}

// PostFilterPlugin is an interface for Post-filter plugin. Post-filter is an
// informational extension point. Plugins will be called with a list of nodes
// that passed the filtering phase. A plugin may use this data to update internal
// state or to generate logs/metrics.
type PostFilterPlugin interface {
    Plugin
    PostFilter(pc *PluginContext, pod *v1.Pod, nodes []*v1.Node, filteredNodesStatuses NodeToStatusMap) *Status
}

// ScorePlugin is an interface that must be implemented by "score" plugins to rank
// nodes that passed the filtering phase.
type ScorePlugin interface {
    Plugin
    Score(pc *PluginContext, p *v1.Pod, nodeName string) (int, *Status)
}

// ScoreWithNormalizePlugin is an interface that must be implemented by "score"
// plugins that also need to normalize the node scoring results produced by the same
// plugin's "Score" method.
type ScoreWithNormalizePlugin interface {
    ScorePlugin
    NormalizeScore(pc *PluginContext, p *v1.Pod, scores NodeScoreList) *Status
}

// ReservePlugin is an interface for Reserve plugins. These plugins are called
// at the reservation point. These are meant to update the state of the plugin.
// This concept used to be called 'assume' in the original scheduler.
// These plugins should return only Success or Error in Status.code. However,
// the scheduler accepts other valid codes as well. Anything other than Success
// will lead to rejection of the pod.
type ReservePlugin interface {
    Plugin
    Reserve(pc *PluginContext, p *v1.Pod, nodeName string) *Status
}

// PreBindPlugin is an interface that must be implemented by "prebind" plugins.
// These plugins are called before a pod being scheduled.
type PreBindPlugin interface {
    Plugin
    PreBind(pc *PluginContext, p *v1.Pod, nodeName string) *Status
}

// PostBindPlugin is an interface that must be implemented by "postbind" plugins.
// These plugins are called after a pod is successfully bound to a node.
type PostBindPlugin interface {
    Plugin
    PostBind(pc *PluginContext, p *v1.Pod, nodeName string)
}

// UnreservePlugin is an interface for Unreserve plugins. This is an informational
// extension point. If a pod was reserved and then rejected in a later phase, then
// un-reserve plugins will be notified. Un-reserve plugins should clean up state
// associated with the reserved Pod.
type UnreservePlugin interface {
    Plugin
    Unreserve(pc *PluginContext, p *v1.Pod, nodeName string)
}

// PermitPlugin is an interface that must be implemented by "permit" plugins.
// These plugins are called before a pod is bound to a node.
type PermitPlugin interface {
    Plugin
    Permit(pc *PluginContext, p *v1.Pod, nodeName string) (*Status, time.Duration)
}

// BindPlugin is an interface that must be implemented by "bind" plugins. Bind
// plugins are used to bind a pod to a Node.
type BindPlugin interface {
    Plugin
    Bind(pc *PluginContext, p *v1.Pod, nodeName string) *Status
}
对于调度框架插件的启用或者禁用,我们可以使用 KubeSchedulerConfiguration 资源对象来进行配置。下面的例子中的配置启用了一个实现了 reserve 和 preBind 扩展点的插件,并且禁用了另外一个插件,同时为插件 foo 提供了一些配置信息:
apiVersion: kubescheduler.config.k8s.io/v1alpha1
kind: KubeSchedulerConfiguration

...

plugins:
  reserve:
    enabled:
    - name: foo
    - name: bar
    disabled:
    - name: baz
  preBind:
    enabled:
    - name: foo
    disabled:
    - name: baz

pluginConfig:
- name: foo
  args: >
    foo插件可以解析的任意内容
扩展的调用顺序如下:
- 如果某个扩展点没有配置对应的扩展,调度框架将使用默认插件中的扩展
- 如果为某个扩展点配置且激活了扩展,则调度框架将先调用默认插件的扩展,再调用配置中的扩展
- 默认插件的扩展始终被最先调用,然后按照
KubeSchedulerConfiguration中扩展的激活enabled顺序逐个调用扩展点的扩展 - 可以先禁用默认插件的扩展,然后在
enabled列表中的某个位置激活默认插件的扩展,这种做法可以改变默认插件的扩展被调用时的顺序
假设默认插件 foo 实现了 reserve 扩展点,此时我们要添加一个插件 bar,想要在 foo 之前被调用,则应该先禁用 foo 再按照 bar foo 的顺序激活。示例配置如下所示:
apiVersion: kubescheduler.config.k8s.io/v1alpha1
kind: KubeSchedulerConfiguration

...

plugins:
  reserve:
    enabled:
    - name: bar
    - name: foo
    disabled:
    - name: foo
在源码目录 pkg/scheduler/framework/plugins/examples 中有几个示范插件,我们可以参照其实现方式。
插件示例代码
其实要实现一个调度框架的插件,并不难,我们只要实现对应的扩展点,然后将插件注册到调度器中即可。Kubernetes官方也提供了相关的插件开发工具和示例可以参考 https://github.com/kubernetes-sigs/scheduler-plugins 。下面是默认调度器在初始化的时候注册的插件:
func NewRegistry() Registry {
    return Registry{
        // FactoryMap:
        // New plugins are registered here.
        // example:
        // {
        //  stateful_plugin.Name: stateful.NewStatefulMultipointExample,
        //  fooplugin.Name: fooplugin.New,
        // }
    }
}
但是可以看到默认并没有注册一些插件,所以要想让调度器能够识别我们的插件代码,就需要自己来实现一个调度器了,当然这个调度器我们完全没必要完全自己实现,直接调用默认的调度器,然后在上面的 NewRegistry() 函数中将我们的插件注册进去即可。在 kube-scheduler 的源码文件 kubernetes/cmd/kube-scheduler/app/server.go 中有一个 NewSchedulerCommand 入口函数,其中的参数是一个类型为 Option 的列表,而这个 Option 恰好就是一个插件配置的定义:
// Option configures a framework.Registry.
type Option func(framework.Registry) error

// NewSchedulerCommand creates a *cobra.Command object with default parameters and registryOptions
func NewSchedulerCommand(registryOptions ...Option) *cobra.Command {
  ......
}
所以我们完全就可以直接调用这个函数来作为我们的函数入口,并且传入我们自己实现的插件作为参数即可,而且该文件下面还有一个名为 WithPlugin 的函数可以来创建一个 Option 实例:
// WithPlugin creates an Option based on plugin name and factory.
func WithPlugin(name string, factory framework.PluginFactory) Option {
    return func(registry framework.Registry) error {
        return registry.Register(name, factory)
    }
}
所以最终我们的入口函数如下所示:
func main() {
    rand.Seed(time.Now().UTC().UnixNano())

    command := app.NewSchedulerCommand(
        app.WithPlugin(sample.Name, sample.New),
    )

    logs.InitLogs()
    defer logs.FlushLogs()

    if err := command.Execute(); err != nil {
        _, _ = fmt.Fprintf(os.Stderr, "%v\n", err)
        os.Exit(1)
    }
}
其中 app.WithPlugin(sample.Name, sample.New) 就是我们接下来要实现的插件,从 WithPlugin 函数的参数也可以看出我们这里的 sample.New 必须是一个 framework.PluginFactory 类型的值,而 PluginFactory 的定义就是一个函数:
type PluginFactory = func(configuration *runtime.Unknown, f FrameworkHandle) (Plugin, error)
所以 sample.New 实际上就是上面的这个函数,在这个函数中我们可以获取到插件中的一些数据然后进行逻辑处理即可,插件实现如下所示,我们这里只是简单获取下数据打印日志,如果你有实际需求的可以根据获取的数据就行处理即可,我们这里只是实现了 PreFilter、Filter、PreBind 三个扩展点,其他的可以用同样的方式来扩展即可:
// 插件名称
const Name = "sample-plugin"

type Args struct {
    FavoriteColor  string `json:"favorite_color,omitempty"`
    FavoriteNumber int    `json:"favorite_number,omitempty"`
    ThanksTo       string `json:"thanks_to,omitempty"`
}

type Sample struct {
    args   *Args
    handle framework.FrameworkHandle
}

func (s *Sample) Name() string {
    return Name
}

func (s *Sample) PreFilter(pc *framework.PluginContext, pod *v1.Pod) *framework.Status {
    klog.V(3).Infof("prefilter pod: %v", pod.Name)
    return framework.NewStatus(framework.Success, "")
}

func (s *Sample) Filter(pc *framework.PluginContext, pod *v1.Pod, nodeName string) *framework.Status {
    klog.V(3).Infof("filter pod: %v, node: %v", pod.Name, nodeName)
    return framework.NewStatus(framework.Success, "")
}

func (s *Sample) PreBind(pc *framework.PluginContext, pod *v1.Pod, nodeName string) *framework.Status {
    if nodeInfo, ok := s.handle.NodeInfoSnapshot().NodeInfoMap[nodeName]; !ok {
        return framework.NewStatus(framework.Error, fmt.Sprintf("prebind get node info error: %+v", nodeName))
    } else {
        klog.V(3).Infof("prebind node info: %+v", nodeInfo.Node())
        return framework.NewStatus(framework.Success, "")
    }
}

//type PluginFactory = func(configuration *runtime.Unknown, f FrameworkHandle) (Plugin, error)
func New(configuration *runtime.Unknown, f framework.FrameworkHandle) (framework.Plugin, error) {
    args := &Args{}
    if err := framework.DecodeInto(configuration, args); err != nil {
        return nil, err
    }
    klog.V(3).Infof("get plugin config args: %+v", args)
    return &Sample{
        args: args,
        handle: f,
    }, nil
}
完整代码可以前往仓库 https://github.com/cnych/sample-scheduler-framework 获取。
插件部署
实现完成后,编译打包成镜像即可,然后我们就可以当成普通的应用用一个 Deployment 控制器来部署即可,由于我们需要去获取集群中的一些资源对象,所以当然需要申请 RBAC 权限,然后同样通过 --config 参数来配置我们的调度器,同样还是使用一个 KubeSchedulerConfiguration 资源对象配置,可以通过 plugins 来启用或者禁用我们实现的插件,也可以通过 pluginConfig 来传递一些参数值给插件:
kind: ClusterRole
apiVersion: rbac.authorization.k8s.io/v1
metadata:
  name: sample-scheduler-clusterrole
rules:
  - apiGroups:
      - ""
    resources:
      - endpoints
      - events
    verbs:
      - create
      - get
      - update
  - apiGroups:
      - ""
    resources:
      - nodes
    verbs:
      - get
      - list
      - watch
  - apiGroups:
      - ""
    resources:
      - pods
    verbs:
      - delete
      - get
      - list
      - watch
      - update
  - apiGroups:
      - ""
    resources:
      - bindings
      - pods/binding
    verbs:
      - create
  - apiGroups:
      - ""
    resources:
      - pods/status
    verbs:
      - patch
      - update
  - apiGroups:
      - ""
    resources:
      - replicationcontrollers
      - services
    verbs:
      - get
      - list
      - watch
  - apiGroups:
      - apps
      - extensions
    resources:
      - replicasets
    verbs:
      - get
      - list
      - watch
  - apiGroups:
      - apps
    resources:
      - statefulsets
    verbs:
      - get
      - list
      - watch
  - apiGroups:
      - policy
    resources:
      - poddisruptionbudgets
    verbs:
      - get
      - list
      - watch
  - apiGroups:
      - ""
    resources:
      - persistentvolumeclaims
      - persistentvolumes
    verbs:
      - get
      - list
      - watch
  - apiGroups:
      - ""
    resources:
      - configmaps
    verbs:
      - get
      - list
      - watch
  - apiGroups:
      - "storage.k8s.io"
    resources:
      - storageclasses
      - csinodes
    verbs:
      - get
      - list
      - watch
  - apiGroups:
      - "coordination.k8s.io"
    resources:
      - leases
    verbs:
      - create
      - get
      - list
      - update
  - apiGroups:
      - "events.k8s.io"
    resources:
      - events
    verbs:
      - create
      - patch
      - update
---
apiVersion: v1
kind: ServiceAccount
metadata:
  name: sample-scheduler-sa
  namespace: kube-system
---
kind: ClusterRoleBinding
apiVersion: rbac.authorization.k8s.io/v1
metadata:
  name: sample-scheduler-clusterrolebinding
  namespace: kube-system
roleRef:
  apiGroup: rbac.authorization.k8s.io
  kind: ClusterRole
  name: sample-scheduler-clusterrole
subjects:
- kind: ServiceAccount
  name: sample-scheduler-sa
  namespace: kube-system
---
apiVersion: v1
kind: ConfigMap
metadata:
  name: scheduler-config
  namespace: kube-system
data:
  scheduler-config.yaml: |
    apiVersion: kubescheduler.config.k8s.io/v1alpha1
    kind: KubeSchedulerConfiguration
    schedulerName: sample-scheduler
    leaderElection:
      leaderElect: true
      lockObjectName: sample-scheduler
      lockObjectNamespace: kube-system
    plugins:
      preFilter:
        enabled:
        - name: "sample-plugin"
      filter:
        enabled:
        - name: "sample-plugin"
      preBind:
        enabled:
        - name: "sample-plugin"
    pluginConfig:
    - name: "sample-plugin"
      args:
        favorite_color: "#326CE5"
        favorite_number: 7
        thanks_to: "thockin"
---
apiVersion: apps/v1
kind: Deployment
metadata:
  name: sample-scheduler
  namespace: kube-system
  labels:
    component: sample-scheduler
spec:
  replicas: 1
  selector:
    matchLabels:
      component: sample-scheduler
  template:
    metadata:
      labels:
        component: sample-scheduler
    spec:
      serviceAccount: sample-scheduler-sa
      priorityClassName: system-cluster-critical
      volumes:
        - name: scheduler-config
          configMap:
            name: scheduler-config
      containers:
        - name: scheduler-ctrl
          image: cnych/sample-scheduler:v0.1.6
          imagePullPolicy: IfNotPresent
          args:
            - sample-scheduler-framework
            - --config=/etc/kubernetes/scheduler-config.yaml
            - --v=3
          resources:
            requests:
              cpu: "50m"
          volumeMounts:
            - name: scheduler-config
              mountPath: /etc/kubernetes
直接部署上面的资源对象即可,这样我们就部署了一个名为 sample-scheduler 的调度器了,接下来我们可以部署一个应用来使用这个调度器进行调度:
apiVersion: apps/v1
kind: Deployment
metadata:
  name: test-scheduler
spec:
  replicas: 1
  selector:
    matchLabels:
      app: test-scheduler
  template:
    metadata:
      labels:
        app: test-scheduler
    spec:
      schedulerName: sample-scheduler
      containers:
      - image: nginx
        imagePullPolicy: IfNotPresent
        name: nginx
        ports:
        - containerPort: 80
这里需要注意的是我们现在手动指定了一个 schedulerName 的字段,将其设置成上面我们自定义的调度器名称 sample-scheduler。
我们直接创建这个资源对象,创建完成后查看我们自定义调度器的日志信息:
$ kubectl get pods -n kube-system -l component=sample-scheduler
NAME                               READY   STATUS    RESTARTS   AGE
sample-scheduler-7c469787f-rwhhd   1/1     Running   0          13m
$ kubectl logs -f sample-scheduler-7c469787f-rwhhd -n kube-system
I0104 08:24:22.087881       1 scheduler.go:530] Attempting to schedule pod: default/test-scheduler-6d779d9465-rq2bb
I0104 08:24:22.087992       1 plugins.go:23] prefilter pod: test-scheduler-6d779d9465-rq2bb
I0104 08:24:22.088657       1 plugins.go:28] filter pod: test-scheduler-6d779d9465-rq2bb, node: ydzs-node1
I0104 08:24:22.088797       1 plugins.go:28] filter pod: test-scheduler-6d779d9465-rq2bb, node: ydzs-node2
I0104 08:24:22.088871       1 plugins.go:28] filter pod: test-scheduler-6d779d9465-rq2bb, node: ydzs-node3
I0104 08:24:22.088946       1 plugins.go:28] filter pod: test-scheduler-6d779d9465-rq2bb, node: ydzs-node4
I0104 08:24:22.088992       1 plugins.go:28] filter pod: test-scheduler-6d779d9465-rq2bb, node: ydzs-master
I0104 08:24:22.090653       1 plugins.go:36] prebind node info: &Node{ObjectMeta:{ydzs-node3   /api/v1/nodes/ydzs-node3 1ff6e228-4d98-4737-b6d3-30a5d55ccdc2 15466372 0 2019-11-10 09:05:09 +0000 UTC <nil> <nil> ......}
I0104 08:24:22.091761       1 factory.go:610] Attempting to bind test-scheduler-6d779d9465-rq2bb to ydzs-node3
I0104 08:24:22.104994       1 scheduler.go:667] pod default/test-scheduler-6d779d9465-rq2bb is bound successfully on node "ydzs-node3", 5 nodes evaluated, 4 nodes were found feasible. Bound node resource: "Capacity: CPU<4>|Memory<8008820Ki>|Pods<110>|StorageEphemeral<17921Mi>; Allocatable: CPU<4>|Memory<7906420Ki>|Pods<110>|StorageEphemeral<16912377419>.".
可以看到当我们创建完 Pod 后,在我们自定义的调度器中就出现了对应的日志,并且在我们定义的扩展点上面都出现了对应的日志,证明我们的示例成功了,也可以通过查看 Pod 的 schedulerName 来验证:
$ kubectl get pods
NAME                                      READY   STATUS    RESTARTS   AGE
test-scheduler-6d779d9465-rq2bb           1/1     Running   0          22m
$ kubectl get pod test-scheduler-6d779d9465-rq2bb -o yaml
......
restartPolicy: Always
schedulerName: sample-scheduler
securityContext: {}
serviceAccount: default
......
在最新的 Kubernetes v1.17 版本中,Scheduler Framework 内置的预选和优选函数已经全部插件化,所以要扩展调度器我们应该掌握并理解调度框架这种方式。