本文主要分析kubernetes中的device-plugin机制工作原理,并通过实现一个简单的device-plugin来加深理解。
背景
默认情况下,kubernetes中的Pod只能申请CPU和Memory这两种资源,就像下面这样:
resources:
  requests:
    memory: "1024Mi"
    cpu: "100m"
  limits:
    memory: "2048Mi"
    cpu: "200m"
随着AI热度越来越高,更多的业务Pod需要申请GPU资源,需要kubernetes能感知到节点上的GPU资源,就像原生的CPU和Memory资源一样使用。
实际上在早期,K8s也提供了一种名为alpha.kubernetes.io/nvidia-gpu的资源来支持NVIDIA GPU,不过后面也发现了很多问题,每增加一种资源都要修改kubernetes核心代码,kubernetes社区压力山大。于是在 1.8 版本引入了device plugin机制,通过插件形式来接入其他资源,设备厂家只需要开发对应的device-plugin就可以将资源接入到kubernetes了。
ps:类似的还有引入
CSI让存储插件从Kubernetes内部(in-tree)代码库中分离出来,改为独立的、可插拔的外部组件(out-of-tree),还有CRI、CNI等等,这里的Device Plugin也能算作其中的一种。
Device Plugin有两层含义,下文中根据语义自行区分:
- 首先它可以代表
kubernetes中的Device Plugin框架 - 其次也可以代表厂家的具体实现,比如
NVIDIA/kubernetes-device-plugin,就是用于接入NVIDIA GPU资源的Device Plugin实现
原理
Device Plugin的工作原理其实不复杂,可以分为插件注册和kubelet 调用插件两部分。
- 插件注册:
DevicePlugin启动时会想节点上的Kubelet发起注册,这样Kubelet就可以感知到该插件的存在了 - kubelet 调用插件:注册完成后,当有
Pod申请对于资源时,Kubelet就会调用该插件 API 实现具体功能
如 kubernetes 官网上的图所示:
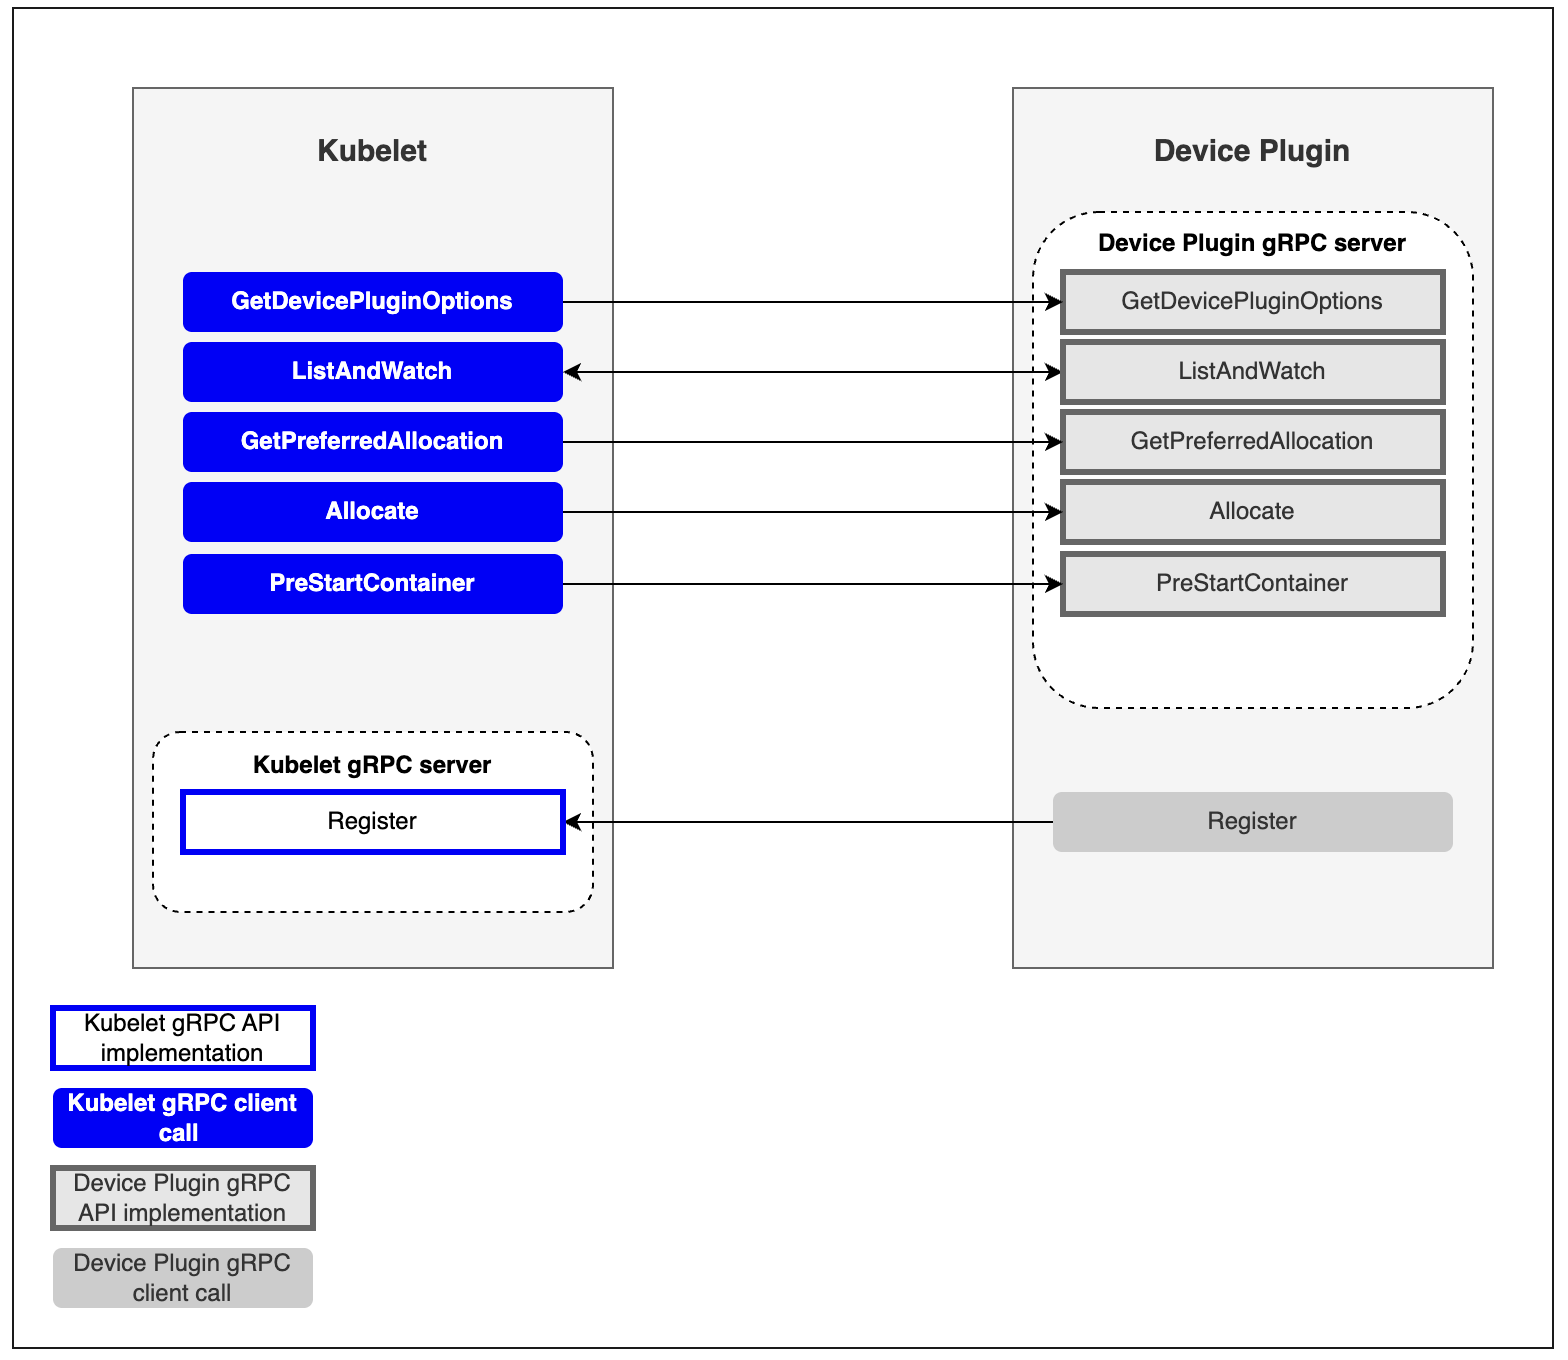
Kubelet 部分
为了提供该功能,Kubelet新增了一个Registration gRPC service:
service Registration {
	rpc Register(RegisterRequest) returns (Empty) {}
}
Device Plugin可以调用该接口向Kubelet进行注册,注册接口需要提供三个参数:
-
Device Plugin对应的unix socket名字:后续Kubelet根据名称找到对应的unix socket,并向插件发起调用 -
Device Plugin调API version:用于区分不同版本的插件 -
Device Plugin提供的ResourceName:遇到不能处理的资源申请时(CPU和Memory之外的资源),Kubelet就会根据申请的资源名称来匹配对应的插件ResourceName需要按照vendor-domain/resourcetype格式,例如nvidia.com/gpu。
Device Plugin 部分
要进行设备管理,Device Plugin插件需要实现以下接口:
-
GetDevicePluginOptions:这个接口用于获取设备插件的信息,可以在其返回的响应中指定一些设备插件的配置选项,可以看做是插件的元数据 -
ListAndWatch:该接口用于列出可用的设备并持续监视这些设备的状态变化。 -
GetPreferredAllocation:将分配偏好信息提供给Device Plugin,以便Device Plugin在分配时可以做出更好的选择 -
Allocate:该接口用于向Device Plugin请求分配指定数量的设备资源。 -
PreStartContainer: 该接口在容器启动之前调用,用于配置容器使用的设备资源。
只有
ListAndWatch和Allocate两个接口是必须的,其他都是可以选的。
工作流程
一般所有的Device Plugin实现最终都会以Pod形式运行在kubernetes集群中,又因为需要管理所有节点,因此都会以DaemonSet方式部署。
Device Plugin启动之后第一步就是向Kubelet注册,让Kubelet知道有一个新的设备接入了。
为了能够调用Kubelet的Register接口,Device PluginPod 会将宿主机上的kubelet.sock文件(unix socket)挂载到容器中,通过kubelet.sock文件发起调用以实现注册。
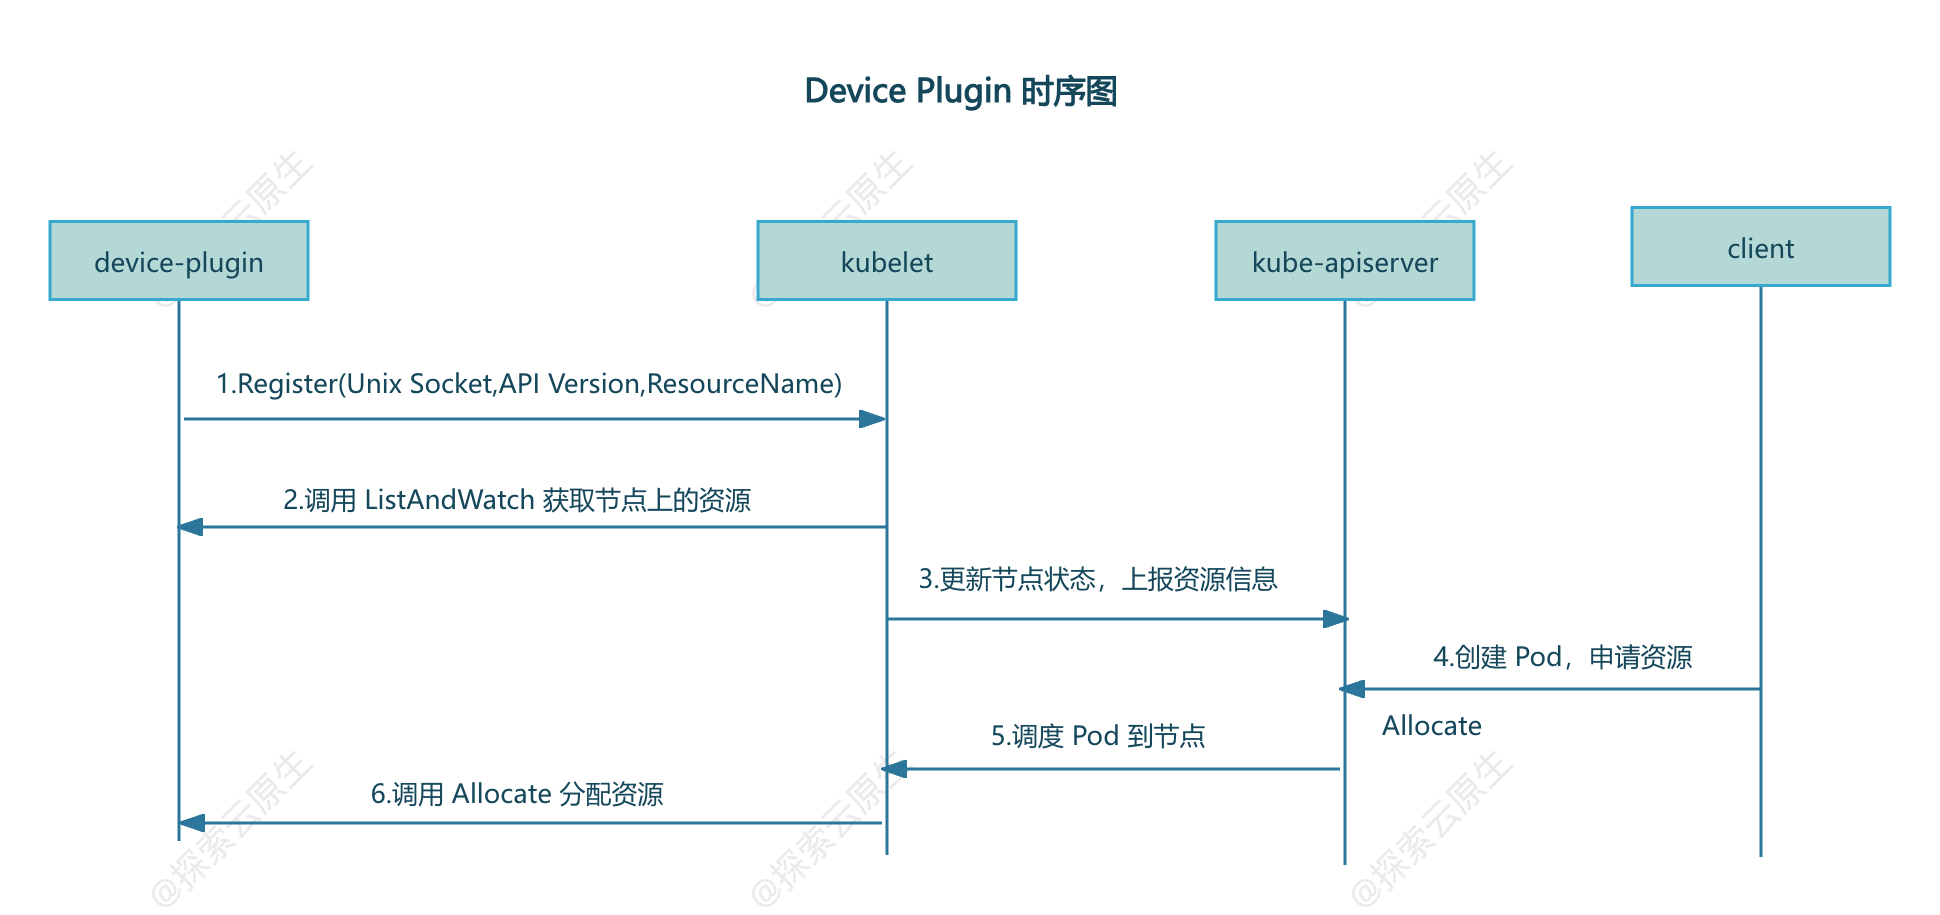
集群部署后,Kubelet就会启动,开始执行Registration gRPC服务。
-
1)
Kubelet启动Registration gRPC服务(kubelet.sock),提供Register接口 -
2)
Device Plugin启动后,通过kubelet.sock调用Register接口,向Kubelet进行注册,注册信息包括Device Plugin的unix socket,API Version,ResourceName -
3)注册成功后,
Kubelet通过Device Plugin的unix socket调用ListAndWatch,获取当前节点上的资源 -
4)
Kubelet向api-server更新节点状态来记录上一步中发现的资源- 此时
kubelet get node -oyaml就能查看到Node对象的Capacity中多了对应的资源
5)用户创建
Pod并申请该资源,调度完成后,对应节点上的Kubelet调用Device Plugin的Allocate接口进行资源分配 - 此时
大致如下:
实现
Device Plugin实现大致分为三部分:
- 1)启动时向
Kubelet发起注册- 注意监控
kubelet的重启,一般是使用fsnotify类似的库监控kubelet.sock的重新创建事件。如果kubelet.sock重新创建了,则认为kubelet是重启了,那么需要重新注册
- 注意监控
- 2)
gRPC Server:主要是实现ListAndWatch和Allocate两个方法
实现 gRPC Server
简单起见,这里只实现了ListAndWatch和Allocate这两个必须的方法。
ListAndWatch
这是一个gRPC的Stream方法,建立长连接,可以持续向Kubelet发送设备的信息。
// ListAndWatch returns a stream of List of Devices
// Whenever a Device state change or a Device disappears, ListAndWatch
// returns the new list
func (c *GopherDevicePlugin) ListAndWatch(_ *pluginapi.Empty, srv pluginapi.DevicePlugin_ListAndWatchServer) error {
	devs := c.dm.Devices()
	klog.Infof("find devices:%s", String(devs))
	err := srv.Send(&pluginapi.ListAndWatchResponse{Devices: devs})
	if err != nil {
		return errors.WithMessage(err, "send device failed")
	}
	klog.Infoln("waiting for device update")
	for range c.dm.notify {
		devs = c.dm.Devices()
		klog.Infof("device update,new device list:%s", String(devs))
		_ = srv.Send(&pluginapi.ListAndWatchResponse{Devices: devs})
	}
	return nil
}
发现设备的部分代码如下:
func (d *DeviceMonitor) List() error {
	err := filepath.Walk(d.path, func(path string, info fs.FileInfo, err error) error {
		if info.IsDir() {
			klog.Infof("%s is dir,skip", path)
			return nil
		}
		d.devices[info.Name()] = &pluginapi.Device{
			ID:     info.Name(),
			Health: pluginapi.Healthy,
		}
		return nil
	})
	return errors.WithMessagef(err, "walk [%s] failed", d.path)
}
很简单,就是遍历查看/etc/gophers目录下的所有文件,每个文件都会当做一个设备。
然后再启动一个Goroutine监控设备的变化,即/etc/gophers目录下文件有变化时通过 chan 发送通知,将最新的设备信息发送给Kubelet。
func (d *DeviceMonitor) Watch() error {
	klog.Infoln("watching devices")
	w, err := fsnotify.NewWatcher()
	if err != nil {
		return errors.WithMessage(err, "new watcher failed")
	}
	defer w.Close()
	errChan := make(chan error)
	go func() {
		defer func() {
			if r := recover(); r != nil {
				errChan <- fmt.Errorf("device watcher panic:%v", r)
			}
		}()
		for {
			select {
			case event, ok := <-w.Events:
				if !ok {
					continue
				}
				klog.Infof("fsnotify device event: %s %s", event.Name, event.Op.String())
				if event.Op == fsnotify.Create {
					dev := path.Base(event.Name)
					d.devices[dev] = &pluginapi.Device{
						ID:     dev,
						Health: pluginapi.Healthy,
					}
					d.notify <- struct{}{}
					klog.Infof("find new device [%s]", dev)
				} else if event.Op&fsnotify.Remove == fsnotify.Remove {
					dev := path.Base(event.Name)
					delete(d.devices, dev)
					d.notify <- struct{}{}
					klog.Infof("device [%s] removed", dev)
				}
			case err, ok := <-w.Errors:
				if !ok {
					continue
				}
				klog.Errorf("fsnotify watch device failed:%v", err)
			}
		}
	}()
	err = w.Add(d.path)
	if err != nil {
		return fmt.Errorf("watch device error:%v", err)
	}
	return <-errChan
}
Allocate
Allocate则是需要告知kubelet怎么将设备分配给容器,这里实现比较简单,就是在对应容器中增加一个环境变量,Gopher=$deviceId
// Allocate is called during container creation so that the Device
// Plugin can run device specific operations and instruct Kubelet
// of the steps to make the Device available in the container
func (c *GopherDevicePlugin) Allocate(_ context.Context, reqs *pluginapi.AllocateRequest) (*pluginapi.AllocateResponse, error) {
	ret := &pluginapi.AllocateResponse{}
	for _, req := range reqs.ContainerRequests {
		klog.Infof("[Allocate] received request: %v", strings.Join(req.DevicesIDs, ","))
		resp := pluginapi.ContainerAllocateResponse{
			Envs: map[string]string{
				"Gopher": strings.Join(req.DevicesIDs, ","),
			},
		}
		ret.ContainerResponses = append(ret.ContainerResponses, &resp)
	}
	return ret, nil
}
简单看一下NVIDIA的device plugin是怎么实现Allocate的。
// Allocate which return list of devices.
func (plugin *NvidiaDevicePlugin) Allocate(ctx context.Context, reqs *pluginapi.AllocateRequest) (*pluginapi.AllocateResponse, error) {
	responses := pluginapi.AllocateResponse{}
	for _, req := range reqs.ContainerRequests {
		if err := plugin.rm.ValidateRequest(req.DevicesIDs); err != nil {
			return nil, fmt.Errorf("invalid allocation request for %q: %w", plugin.rm.Resource(), err)
		}
		response, err := plugin.getAllocateResponse(req.DevicesIDs)
		if err != nil {
			return nil, fmt.Errorf("failed to get allocate response: %v", err)
		}
		responses.ContainerResponses = append(responses.ContainerResponses, response)
	}
	return &responses, nil
}
核心其实是这个方法:
// updateResponseForDeviceListEnvvar sets the environment variable for the requested devices.
func (plugin *NvidiaDevicePlugin) updateResponseForDeviceListEnvvar(response *pluginapi.ContainerAllocateResponse, deviceIDs ...string) {
	response.Envs[plugin.deviceListEnvvar] = strings.Join(deviceIDs, ",")
}
给容器添加了一个环境变量,value为设备 id,具体deviceID提供了两种测量,可能是编号或者uuid。
const (
	DeviceIDStrategyUUID  = "uuid"
	DeviceIDStrategyIndex = "index"
)
key是一个变量plugin.deviceListEnvvar,初始化如下:
plugin := NvidiaDevicePlugin{
  deviceListEnvvar:     "NVIDIA_VISIBLE_DEVICES",
  socket:               pluginPath + ".sock",
  // ...
}
也就是说NVIDIA的device plugin实现Allocate主要就是给容器增加了环境变量,例如:
NVIDIA_VISIBLE_DEVICES=GPU-03f69c50-207a-2038-9b45-23cac89cb67d
或者
NVIDIA_VISIBLE_DEVICES=1,2
GPU Operator会使用NVIDIA Container Toolit Installer安装NVIDIA Container Toolit。
这个NVIDIA Container Toolit的作用就是添加对GPU的支持,也包括了识别NVIDIA_VISIBLE_DEVICES这个环境变量,然后将对应设备挂载到容器里。
除此之外还会把设备挂载到容器里:
func (plugin *NvidiaDevicePlugin) apiDeviceSpecs(devRoot string, ids []string) []*pluginapi.DeviceSpec {
	optional := map[string]bool{
		"/dev/nvidiactl":        true,
		"/dev/nvidia-uvm":       true,
		"/dev/nvidia-uvm-tools": true,
		"/dev/nvidia-modeset":   true,
	}
	paths := plugin.rm.GetDevicePaths(ids)
	var specs []*pluginapi.DeviceSpec
	for _, p := range paths {
		if optional[p] {
			if _, err := os.Stat(p); err != nil {
				continue
			}
		}
		spec := &pluginapi.DeviceSpec{
			ContainerPath: p,
			HostPath:      filepath.Join(devRoot, p),
			Permissions:   "rw",
		}
		specs = append(specs, spec)
	}
	return specs
}
核心为:
spec := &pluginapi.DeviceSpec{
  ContainerPath: p,
  HostPath:      filepath.Join(devRoot, p),
  Permissions:   "rw",
}
这里指定了设备在宿主机上的Path和挂载到容器之后的Path,后续就可以根据这些信息进行设备挂载了。
实际上device plugin提供了多种方法来完成设备分配,实现时只需要根据具体情况选择其中一种即可:
- Env
- Mounts
- Devices
- Annotations
- CDIDevices
比如nvidia device plugin在实现时就同时使用了Env和Devices方式。
又比如 ix-device-plugin 就是用的Devices方式,直接指定分配给容器的设备在宿主机的位置,以及要挂载到容器中的位置:
func (p *iluvatarDevicePlugin) allocateDevicesByDeviceID(hostminor uint, num int) *pluginapi.DeviceSpec {
	var device pluginapi.DeviceSpec
	hostPathPrefix := "/dev/"
	containerPathPrefix := "/dev/"
	// Expose the device node for iluvatar pod.
	device.HostPath = hostPathPrefix + deviceName + strconv.Itoa(int(hostminor))
	device.ContainerPath = containerPathPrefix + deviceName + strconv.Itoa(num)
	device.Permissions = "rw"
	return &device
}
其他方法
另外几个方法非强制的,因此只做一个空实现。
// GetDevicePluginOptions returns options to be communicated with Device
// Manager
func (c *GopherDevicePlugin) GetDevicePluginOptions(_ context.Context, _ *pluginapi.Empty) (*pluginapi.DevicePluginOptions, error) {
	return &pluginapi.DevicePluginOptions{PreStartRequired: true}, nil
}
// GetPreferredAllocation returns a preferred set of devices to allocate
// from a list of available ones. The resulting preferred allocation is not
// guaranteed to be the allocation ultimately performed by the
// devicemanager. It is only designed to help the devicemanager make a more
// informed allocation decision when possible.
func (c *GopherDevicePlugin) GetPreferredAllocation(_ context.Context, _ *pluginapi.PreferredAllocationRequest) (*pluginapi.PreferredAllocationResponse, error) {
	return &pluginapi.PreferredAllocationResponse{}, nil
}
// PreStartContainer is called, if indicated by Device Plugin during registeration phase,
// before each container start. Device plugin can run device specific operations
// such as reseting the device before making devices available to the container
func (c *GopherDevicePlugin) PreStartContainer(_ context.Context, _ *pluginapi.PreStartContainerRequest) (*pluginapi.PreStartContainerResponse, error) {
	return &pluginapi.PreStartContainerResponse{}, nil
}
向 Kubelet 进行注册
注册也是很简单,调用deviceplugin提供的RegisterRequest方法即可。
// Register registers the device plugin for the given resourceName with Kubelet.
func (c *GopherDevicePlugin) Register() error {
	conn, err := connect(pluginapi.KubeletSocket, common.ConnectTimeout)
	if err != nil {
		return errors.WithMessagef(err, "connect to %s failed", pluginapi.KubeletSocket)
	}
	defer conn.Close()
	client := pluginapi.NewRegistrationClient(conn)
	reqt := &pluginapi.RegisterRequest{
		Version:      pluginapi.Version,
		Endpoint:     path.Base(common.DeviceSocket),
		ResourceName: common.ResourceName,
	}
	_, err = client.Register(context.Background(), reqt)
	if err != nil {
		return errors.WithMessage(err, "register to kubelet failed")
	}
	return nil
}
监控 kubelet.sock 状态
使用fsnotify库监控kubelet.sock文件状态,通过kubelet.sock文件的变化来判断kubelet是否重启,当kubelet重启后device plugin也需要重启,然后注册到新的kubelet.sock。
// WatchKubelet restart device plugin when kubelet restarted
func WatchKubelet(stop chan<- struct{}) error {
	watcher, err := fsnotify.NewWatcher()
	if err != nil {
		return errors.WithMessage(err, "Unable to create fsnotify watcher")
	}
	defer watcher.Close()
	go func() {
		// Start listening for events.
		for {
			select {
			case event, ok := <-watcher.Events:
				if !ok {
					continue
				}
				klog.Infof("fsnotify events: %s %v", event.Name, event.Op.String())
				if event.Name == pluginapi.KubeletSocket && event.Op == fsnotify.Create {
					klog.Warning("inotify: kubelet.sock created, restarting.")
					stop <- struct{}{}
				}
			case err, ok := <-watcher.Errors:
				if !ok {
					continue
				}
				klog.Errorf("fsnotify failed restarting,detail:%v", err)
			}
		}
	}()
	// watch kubelet.sock
	err = watcher.Add(pluginapi.KubeletSocket)
	if err != nil {
		return errors.WithMessagef(err, "Unable to add path %s to watcher", pluginapi.KubeletSocket)
	}
	return nil
}
为什么需要重新注册
因为Kubelet中使用一个 map 来存储注册的插件,因此每次Kubelet重启都会丢失,所以我们在实现device plugin时就要监控Kubelet重启状态并重新注册。
Kubelet Register 方法 实现如下:
// /pkg/kubelet/cm/devicemanager/plugin/v1beta1/server.go#L143-L165
func (s *server) Register(ctx context.Context, r *api.RegisterRequest) (*api.Empty, error) {
	klog.InfoS("Got registration request from device plugin with resource", "resourceName", r.ResourceName)
	metrics.DevicePluginRegistrationCount.WithLabelValues(r.ResourceName).Inc()
	if !s.isVersionCompatibleWithPlugin(r.Version) {
		err := fmt.Errorf(errUnsupportedVersion, r.Version, api.SupportedVersions)
		klog.InfoS("Bad registration request from device plugin with resource", "resourceName", r.ResourceName, "err", err)
		return &api.Empty{}, err
	}
	if !v1helper.IsExtendedResourceName(core.ResourceName(r.ResourceName)) {
		err := fmt.Errorf(errInvalidResourceName, r.ResourceName)
		klog.InfoS("Bad registration request from device plugin", "err", err)
		return &api.Empty{}, err
	}
	if err := s.connectClient(r.ResourceName, filepath.Join(s.socketDir, r.Endpoint)); err != nil {
		klog.InfoS("Error connecting to device plugin client", "err", err)
		return &api.Empty{}, err
	}
	return &api.Empty{}, nil
}
核心在connectClient方法:
// /pkg/kubelet/cm/devicemanager/plugin/v1beta1/server.go#L143-L165
func (s *server) connectClient(name string, socketPath string) error {
	c := NewPluginClient(name, socketPath, s.chandler)
	s.registerClient(name, c)
	if err := c.Connect(); err != nil {
		s.deregisterClient(name)
		klog.ErrorS(err, "Failed to connect to new client", "resource", name)
		return err
	}
	go func() {
		s.runClient(name, c)
	}()
	return nil
}
怎么保存这个client呢?
func (s *server) registerClient(name string, c Client) {
	s.mutex.Lock()
	defer s.mutex.Unlock()
	s.clients[name] = c
	klog.V(2).InfoS("Registered client", "name", name)
}
定义如下:
// /pkg/kubelet/cm/devicemanager/plugin/v1beta1/server.go#L143-L165
type server struct {
	socketName string
	socketDir  string
	mutex      sync.Mutex
	wg         sync.WaitGroup
	grpc       *grpc.Server
	rhandler   RegistrationHandler
	chandler   ClientHandler
	clients    map[string]Client // 使用 map 存储,并为持久化
}
main.go
main方法分为三个部分:
- 1)启动
gRPC服务 - 2)向
Kubelet进行注册 - 3)监控
kubelet.sock状态
func main() {
	klog.Infof("device plugin starting")
	dp := device_plugin.NewGopherDevicePlugin()
	go dp.Run()
	// register when device plugin start
	if err := dp.Register(); err != nil {
		klog.Fatalf("register to kubelet failed: %v", err)
	}
	// watch kubelet.sock,when kubelet restart,exit device plugin,then will restart by DaemonSet
	stop := make(chan struct{})
	err := utils.WatchKubelet(stop)
	if err != nil {
		klog.Fatalf("start to kubelet failed: %v", err)
	}
	<-stop
	klog.Infof("kubelet restart,exiting")
}
测试
部署
首先是部署i-device-plugin,一般使用DaemonSet方式部署,完整 yaml 如下:
apiVersion: apps/v1
kind: DaemonSet
metadata:
  name: i-device-plugin
  namespace: kube-system
  labels:
    app: i-device-plugin
spec:
  selector:
    matchLabels:
      app: i-device-plugin
  template:
    metadata:
      labels:
        app: i-device-plugin
    spec:
      containers:
        - name: i-device-plugin
          image: docker.io/lixd96/i-device-plugin:latest
          imagePullPolicy: IfNotPresent
          resources:
            limits:
              cpu: "1"
              memory: "512Mi"
            requests:
              cpu: "0.1"
              memory: "128Mi"
          volumeMounts:
            - name: device-plugin
              mountPath: /var/lib/kubelet/device-plugins
            - name: gophers
              mountPath: /etc/gophers
      volumes:
        - name: device-plugin
          hostPath:
            path: /var/lib/kubelet/device-plugins
        - name: gophers
          hostPath:
            path: /etc/gophers
以hostPath方式将用到的两个目录挂载到Pod里:
/var/lib/kubelet/device-plugins:请求kubelet.sock发起调用,同时将device-plugingRPC 服务的 sock 文件写入该目录供kubelet调用/etc/gophers:在该 Demo 中,把/etc/gophers目录下的文件作为设备,因此需要将其挂载到 Pod 里。
确保i-device-plugin已经启动。
[root@test ~]# kubectl -n kube-system get po
i-device-plugin-vnw6z            1/1     Running   0          17s
初始化
在该 Demo 中,把/etc/gophers目录下的文件作为设备,因此我们只需要到/etc/gophers目录下创建文件,模拟有新的设备接入即可。
mkdir /etc/gophers
touch /etc/gophers/g1
查看device plugin日志
[root@test ~]# kubectl -n kube-system logs -f i-device-plugin-vnw6z
I0719 13:52:24.674737       1 main.go:10] device plugin starting
I0719 13:52:24.675440       1 device_monitor.go:33] /etc/gophers is dir,skip
I0719 13:52:24.675679       1 device_monitor.go:49] watching devices
I0719 13:52:24.682141       1 api.go:22] find devices []
I0719 13:52:24.682315       1 api.go:29] waiting for device update
I0719 13:53:09.369381       1 device_monitor.go:70] fsnotify device event: /etc/gophers/g1 CREATE
I0719 13:53:09.370394       1 device_monitor.go:79] find new device [g1]
I0719 13:53:09.370445       1 device_monitor.go:70] fsnotify device event: /etc/gophers/g1 CHMOD
I0719 13:53:09.370659       1 api.go:32] device update,new device list [g1]
可以看到,已经感知到新增的设备了。
不出意外的话可以在node上看到新资源了
[root@test gophers]# k get node n1 -oyaml|grep  capacity -A 7
  capacity:
    cpu: "4"
    ephemeral-storage: 20960236Ki
    hugepages-1Gi: "0"
    hugepages-2Mi: "0"
    lixueduan.com/gopher: "1"
    memory: 8154984Ki
    pods: "110"
果然,node capacity中新增了lixueduan.com/gopher: "1"。
创建测试 Pod
接下来创建一个 Pod 申请该资源试试
apiVersion: v1
kind: Pod
metadata:
  name: gopher-pod
spec:
  containers:
  - name: gopher-container
    image: busybox
    command: ["sh", "-c", "echo Hello, Kubernetes! && sleep 3600"]
    resources:
      requests:
        lixueduan.com/gopher: "1"
      limits:
        lixueduan.com/gopher: "1"
Pod 启动成功
[root@test ~]# kubectl get po
NAME         READY   STATUS    RESTARTS   AGE
gopher-pod   1/1     Running   0          27s
之前分配设备是添加Gopher=xxx这个环境变量,现在看下是否正常分配
[root@test ~]# kubectl exec -it gopher-pod -- env|grep Gopher
Gopher=g1
ok,环境变量存在,可以看到分配给该Pod的设备是g1。
新增设备
使用同样的yaml改下名称再创建一个 Pod
[root@test ~]# k get po
NAME          READY   STATUS    RESTARTS   AGE
gopher-pod    1/1     Running   0          3m9s
gopher-pod2   0/1     Pending   0          2s
因为只有一个gopher资源,因此第二个Podpending`了。
Events:
  Type     Reason            Age   From               Message
  ----     ------            ----  ----               -------
  Warning  FailedScheduling  7s    default-scheduler  0/1 nodes are available: 1 Insufficient lixueduan.com/gopher. preemption: 0/1 nodes are available: 1 No preemption victims found for incoming pod..
在创建一个设备
touch /etc/gophers/g2
device plugin 立马感知到了设备变化,相关日志如下:
I0719 14:01:00.308599       1 device_monitor.go:70] fsnotify device event: /etc/gophers/g2 CREATE
I0719 14:01:00.308986       1 device_monitor.go:79] find new device [g2]
I0719 14:01:00.309017       1 device_monitor.go:70] fsnotify device event: /etc/gophers/g2 CHMOD
I0719 14:01:00.309141       1 api.go:32] device update,new device list [g2,g1]
node上的资源数量也更新为 2
[root@argo-1 ~]# k get node argo-1 -oyaml|grep  capacity -A 7
  capacity:
    cpu: "4"
    ephemeral-storage: 20960236Ki
    hugepages-1Gi: "0"
    hugepages-2Mi: "0"
    lixueduan.com/gopher: "2"
    memory: 8154984Ki
    pods: "110"
然后 pod2 也可以正常启动了
[root@test ~]# kubectl get po
NAME          READY   STATUS    RESTARTS   AGE
gopher-pod    1/1     Running   0          4m31s
gopher-pod2   1/1     Running   0          84s
删除设备
然后删除 g2 设备
rm -rf /etc/gophers/g2
device plugin 也是能正常感知到,相关日志
I0719 14:03:55.904983       1 device_monitor.go:70] fsnotify device event: /etc/gophers/g2 REMOVE
I0719 14:03:55.905203       1 device_monitor.go:84] device [g2] removed
I0719 14:03:55.905267       1 api.go:32] device update,new device list [g1]
查看Node上的资源数量更新没有
[root@test ~]# k get node argo-1 -oyaml|grep  capacity -A 7
  capacity:
    cpu: "4"
    ephemeral-storage: 20960236Ki
    hugepages-1Gi: "0"
    hugepages-2Mi: "0"
    lixueduan.com/gopher: "1"
    memory: 8154984Ki
    pods: "110"
对应资源也变成 1 个了,一切正常。
小结
本文主要分析了kubernetes中的Device Plugin机制的工作原理,并实现了一个简单的i-device-plugin来进一步加深理解。
Device Plugin的工作原理其实不复杂,可以分为插件注册和kubelet 调用插件两部分:
- 插件注册:
DevicePlugin启动时会想节点上的Kubelet发起注册,这样Kubelet就可以感知到该插件的存在了 kubelet调用插件:注册完成后,当有Pod申请对于资源时,kubelet就会调用该插件 API 实现具体功能
以下是总结的几个常见问题:
1)device plugin 是怎么感知节点上的设备的?
- 一般设备都会在
/dev/目录下,比如NVIDIA GPU就是/dev/nvidia0、/dev/nvidia1这样,不过具体逻辑还是得硬件厂商自己实现 - 然后
device plugin会以DaemonSet方式部署到所有节点,因此能发现每个节点上的设备
2)device plugin Allocate 方法怎么实现分配设备给容器的?
需要注意一点:
Allocate方法并没有真正将设备分配给容器,因为这个时候甚至都还没创建容器,只是在该方法中可以通过Env、Mounts、Devices、Annotations、CDIDevices等不同形式来传递要将那些设备分配给该容器这个信息给后续组件。
这些信息传给Kubelet,然后Kubelet通过CRI调用Runtime(Docker/Containerd等等)真正开始创建容器。
比如NVIDIA在Allocate中就传递了NVIDIA_VISIBLE_DEVICES这个 Env,然后自己实现了nvidia-container-runtime,该 runtime 就可以根据该 Env 知道要把哪个 GPU 分配给容器,然后修改容器的 OCI Spec,最终runC(或者其他实现)真正创建容器时就会按照这个描述去处理。
又比如 ix-device-plugin 就是用的Devices方式,直接指定分配给容器的设备在宿主机的位置,以及要挂载到容器中的位置,这样就不需要实现自己的 container-runtime 了,runC创建容器时也能把对应设备分配给容器。
这样又引出一个小问题,既然(ix-device-plugin)这个实现只用Devices就能正常运行,那为什么NVIDIA实现Devices又实现了一个Env?
其实这个Env的实现是为了兼容非kubernetes环境,比如Docker环境:
NVIDIA可以在启动容器时指定GPU
# --gpus
docker run --gpus device=0 -it tensorflow/tensorflow:latest-gpu bash
# 或者环境变量 NVIDIA_VISIBLE_DEVICES
docker run -e NVIDIA_VISIBLE_DEVICES=0 -it tensorflow/tensorflow:latest-gpu bash
而ix-device-plugin则不行,就像这样:
sudo docker run --shm-size="32g" -it -v /usr/src:/usr/src -v /lib/modules:/lib/modules -v /dev:/dev --privileged --cap-add=ALL --pid=host corex:4.0.1
可以看到,需要自己使用-v将相关文件挂载进容器才能使用,nvidia-container-runtime 实则是将这部分进行了封装简化,用户只需要传一个参数即可。
3)为什么 device plugin 要 Watch Kubelet 状态,当 Kubelet 重启后 device plugin 也要跟着重启。
这个问题实际上可以翻译为:为什么Kubelet重启后,device plugin需要重新向Kubelet注册?
因为device plugin的注册信息Kubelet是存在内存中的,使用Go中的Map结构进行存储。重启后就会丢失,因此各个device plugin都需要重新注册。
至于为什么device plugin一般也会跟着重启,是因为device plugin在启动时会调用因此注册接口,因此感知到Kubelet重启了,直接让device plugin退出即可,然后DaemonSet会重新拉起 Pod,这样启动后自动调用注册接口。